In this Photoshop text effects tutorial, we'll learn how to easily create metal text, a popular effect widely used in video games
and movie posters! It may seem like there's a lot of steps involved, but once you've done it a few times, creating the effect won't take you more than a few minutes from start to finish. To create the metal texture itself and apply it to the text, we'll be using a couple of layer styles, some filters, layer blend modes, and a clipping mask! I'll be using Photoshop CS5 for this tutorial but any recent version of Photoshop will work.
Here's the final result we'll be creating:
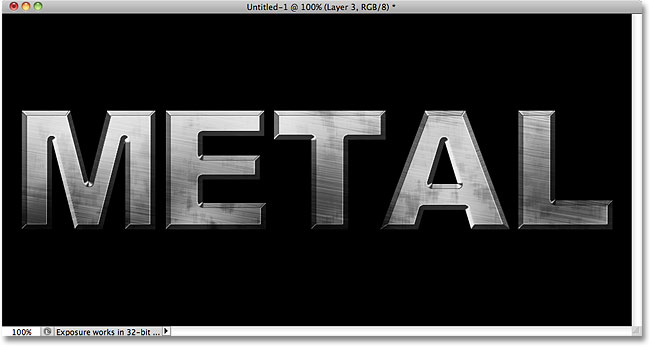
The final "metal text" effect.
Let's get started!
Want an easier way to follow along with our tutorials? Download them as printable PDFs!
Step 1: Create A New Document
Create a new Photoshop document by going up to the File menu in the Menu Bar at the top of the screen and choosing New, or press Ctrl+N (Win) / Command+N (Mac ) on your keyboard for a faster shortcut:

Go to File > New.
You'll want to create a document that's a little bigger than you need, for reasons we'll see in a moment. I'll make my document 1200 pixels wide by 600 pixels high, and I'll leave the resolution at its default 72 pixels/inch. You can use these same settings to follow along or enter your own values. Set the Background Contents option to White for now, even though we'll be changing it in the next step. Click OK when you're done. Your new document will appear on the screen:

The New Document dialog box.
Step 2: Fill The Background With Black
Press the letter D on your keyboard to quickly reset Photoshop's Foreground and Background colors to their defaults if needed, which will set your Foreground color to black. Then press Alt+Backspace (Win) / Option+Delete (Mac) to quickly fill the document with the current Foreground color (black):

The document is now filled with black.
Step 3: Add A New Blank Layer
Click on the New Layer icon at the bottom of the Layers panel:
Click on the New Layer icon (second icon from the right).
Photoshop adds a new blank layer named "Layer 1" above the Background layer:

The new layer appears above the Background layer.
Step 4: Fill The New Layer With Light Gray
Go up to the Edit menu at the top of the screen and choose Fill:

Go to Edit > Fill.
When the Fill dialog box appears, click on the drop-down box to the right of the word Use and select Color from the list of options:
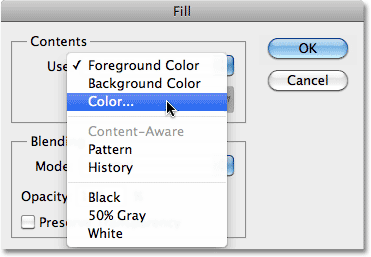
Choose Color for the Use option at the top of the Fill dialog box.
As soon as you select Color, Photoshop will pop open the Color Picker so you can choose the color you want to fill the layer with. Choose a light gray. If you want to use the exact shade of gray I'm using, enter 195 for the R, G and B options:
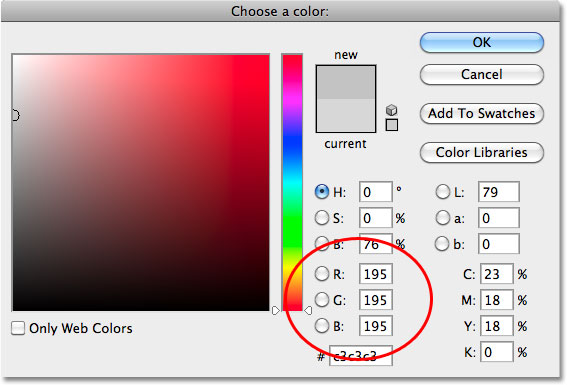
Choose a light gray from the Color Picker.
Click OK when you're done to exit out of the Color Picker, then click OK to exit out of the Fill dialog box. Photoshop fills the layer with gray, temporarily hiding the black-filled Background layer from view:

The document now appears filled with gray.
Step 5: Add Noise
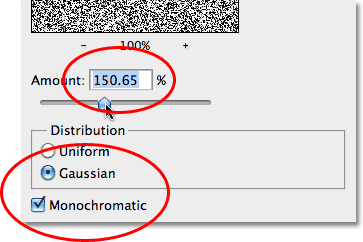
Go up to the Filter menu at the top of the screen, choose Noise, and then choose Add Noise:

Go to Filter > Noise > Add Noise.
When the Add Noise dialog box appears, add lots of noise to the image by setting the Amount to around 150%. Make sure theGaussian and Monochromatic options are selected at the bottom of the dialog box:
The Add Noise filter options.
Click OK when you're done to exit out of the dialog box. The document should now be filled with noise:

The document after applying the Add Noise filter.


0 comments:
Post a Comment